


CORRUGATED WORKS IN LARGE FORMAT
Freely mounted with T-fold
With this mounting principle, your picture looks as if it were floating freely in the DISTANCE magnetic frame. The corrugated paper is fixed on the back. Not only the structure of the paper itself, but also specially designed edges are perfectly accentuated. The result is a unique depth effect. The picture is somewhat smaller than the picture frame and the glass does not rest on the object due to the distance strips of the picture frame, which offers your work of art the ideal protection. This mounting variant is particularly suitable for large and heavy works, as in this example "Artist Pen F, 113 cm on 113 cm, 2017" by the artist John Schmitz.
Optional utensils:
- gloves
- hand brush
- cleaning cloth
Tools:
- steel ruler
- sandbag or empty water glass with rounded bottom
- soft pencil
- folding stick
Note:
In this case the framed picture is often transported to exhibitions, which requires a strong and therefore safe and reliable mounting. For this reason, strong self-adhesive tapes were used. Since there are no plans to remove the picture from the frame, this was the best compromise. Every assembly is a balancing of relevant factors in order to find the best possible balance between presentation, stability, disassembly and financial expenditure.
This type of mounting is suitable for:
This type of mounting with T-folds is particularly suitable for large, wavy paper works with or without sensitive surfaces. This includes, for example, watercolours and work on handmade paper. Prints, photos, chalk drawings and pastel drawings also show to advantage with this type of mounting. This type of mounting is suitable for very heavy work and the picture can easily removed from the frame, but adhesive residues remain on the picture.
This type of mounting is not suitable for:
Even if the picture can be easily removed from the back wall cardboard later, adhesive residues remain. Therefore, this method is not ideal for valuable pictures or originals. Nevertheless, it is a higher quality installation method for large and heavy work and often the only installation method that can be implemented by the user.
Here's how it works:
1. Open the frame
First open the frame and place the tools and accessories at hand.
2. Alignment
Now place the image by sense of proportion at the desired position in the basic element.
3. Measuring
In the next step, measure the exact position of the image. Since papers are not always exactly right-angled, it is important to measure from all sides and align according to an average value. The most important thing is that the image looks centered.


7. Glue T-fold
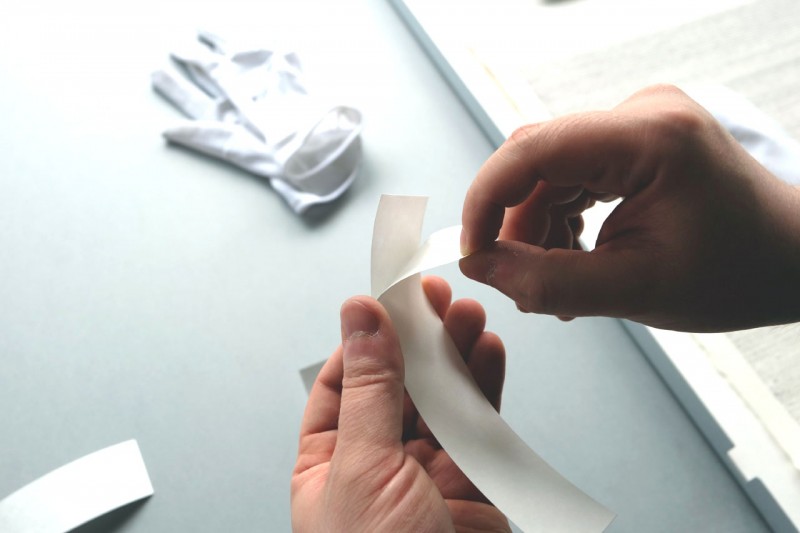
Pull off the silicon paper of the crossbar completely and place the strip with the self-adhesive side up. Now stick the adhesive surface to an adhesive surface in the middle to obtain a kind of "T" with mutual adhesive surfaces. Note that you only have one try for this.
8. Reapply silicone paper
Then you can glue the silicon paper back on and get the finished fold.
9.1 Attaching the T-fold
Stick all folds to the marked positions on the background cardboard.
4. Weighing down the bottom part
It is best to weigh the picture at the bottom and in the middle so that the paper needs less bending. Use sandbags or empty water glasses.

5. Marking
In order to place the folds more easily, it is helpful to mark the positions with a soft pencil. To do this, place a mark on the outside and in the middle of the upper part. For larger works, however, additional folds may have to be set. The top edge of the fold should be moved about 20 millimetres from top to centre or downwards. In order to leave enough space for the cross bar, the folds must be set inwards accordingly. The easiest way is to mark the outermost upper position.

6. Prepare folds
When preparing the folds, it should be noted that the adhesive strips in contact with the picture have been shortened to 80 millimetres in this example. However, the crossbars remain in their original length (100 millimeters). Now peel off half of the silicon paper and fold it over.


Accessories:


10. Insert picture
Now pull the silicon paper from the glued folds while a second person lifts the paper. Now you can place the image carefully from the center.
11. Rubbing
Press the image down well and then rub well with paper to protect it. As the bottom of the image protrudes forward, it must also be fixed there.
12. Weighing down the upper part
To fix the bottom of the image, now weigh the image down at the top. The bottom is fixed to prevent the paper from protruding when it hangs.
9.2 Rubbing with folding stick
For a secure hold, rub the fold well with a folding stick.


13. Prepare V-fold
The smaller V-folds are sufficient for fixing the bottom of the picture.
Tip
With this size you have to work with two people.
Required utensils
, single-sided")

Buy used articles in the shop

14. Measuring & marking
Glue in the fold on the bottom in the middle and on the outside, offset about 20 millimetres inwards. For larger works, however, more folds may have to be placed. If the sides of the picture bulge forward for medium or large works, small folds must also be placed on the sides. It is also helpful to mark the position with a pencil at the bottom.
Tip
If the paper is strongly corrugated, it is only mounted at those points where the paper touches the back wall by itself.


15. Glueing
Glue the fold at the previously marked position onto the background cardboard. Then rub it well with a folding stick.
16. Dusting off
Now carefully remove dust and other foreign objects from your picture with a hand brush.


17. Attach distance strips
Now reinsert the distance strips into the basic element. Note that the end of the strip must be located at one outer edge of the basic element. The remaining gap is not closed until all four strips are seated.
18. Connect distance strips
Slide the distance strips against each other with light pressure to close the gaps.
19. Place the glass in position
Now place the glass back on your picture frame. This should be done very carefully when using a glass of this size and definitely with two people. Then wipe off dust and fingerprints.


20. Framing
Now you can put the overframe back on again. Press it on only lightly - thanks to our magnetic frame principle, the picture frame closes magnetically.
21. Check
Check if the paper is securely held by the folds and that the center does not bend forward.
22. Ready
This mounting principle is extraordinary and gives the final touch to every picture. The whole work of art, including its beautifully designed edges, can thus be shown to its best advantage.
Tip
The color of the back wall cardboard should be a shade darker or more yellow than the paper of the picture. So the picture looks whiter, fresher and newer.
