

Picture Frames for Schools
Tips from Planning to Mounting
With HALBE magnetic frames you can frame pictures quickly, easily and without tools. The video shows in less than 1 minute how it works and why the frames are so popular! Framing is so easy that it means that students can join in instead of watching. Especially the participation in planning, organization and construction is an essential element to gain experience and to encourage creativity.
Schools should be safe, enjoyable and durable. Moreover, the HALBE magnetic frames are very easy to handle - a major advantage, because this way students and art teachers can frame and exchange their pictures "as easy as child's play": The frame can be removed from the front side with a thumb pressure on the glass. Glass, picture and, if necessary, passepartout can be inserted from the visible front side without turning the frame over - a noticeable advantage over conventional picture frames. Finally, the profile frame is simply pressed on again and the frame components hold together magnetically. Finished.
In economical terms: HALBE is not a retailer, you buy directly from the manufacturer. This guarantees you the best quality advice and a very good price-performance ratio.
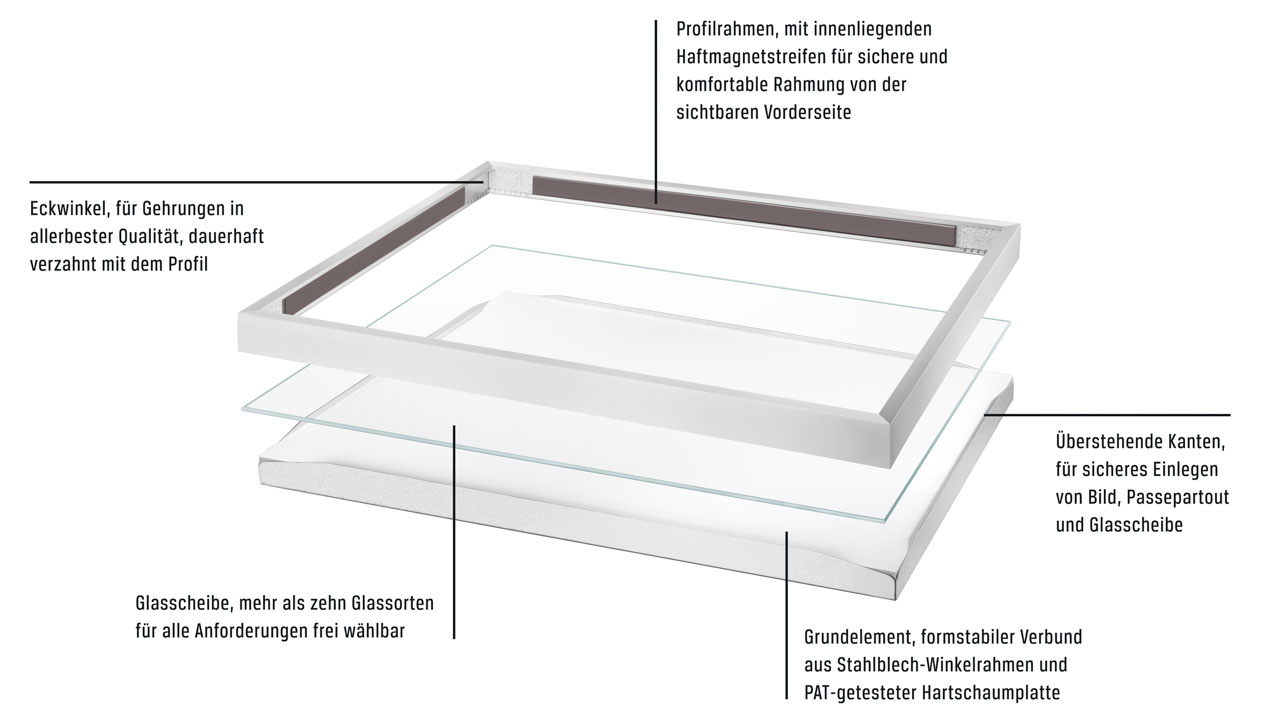
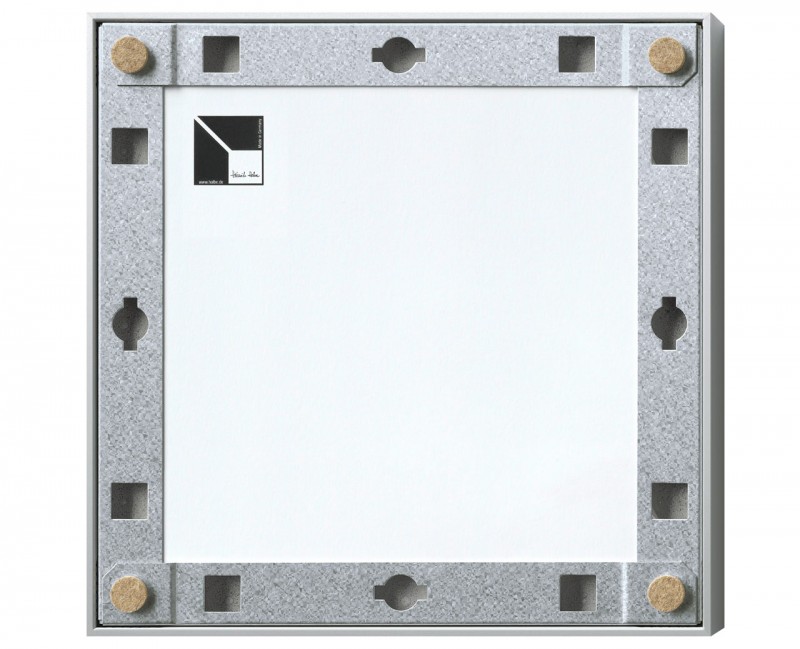
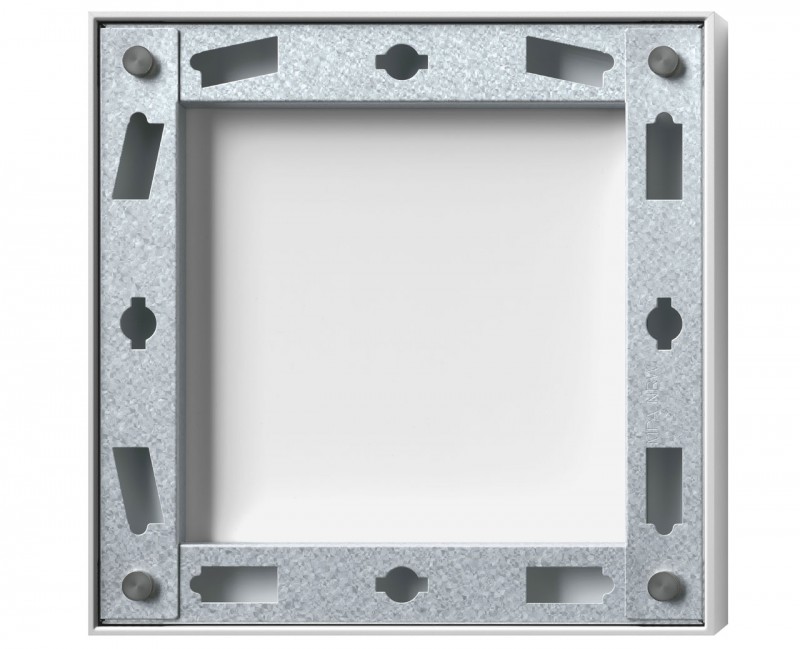
The HALBE magnetic frame in individual parts, example Classic Alu 8:
The basic element is, so to speak, the back of the picture frame and gives the frame a high degree of stability. The picture has a particularly good flat position, the glass is held securely by protruding edges and can be placed perfectly. The profile of the picture frame has magnetic strips on the inside, which permanently adhere to the sheet metal angle of the basic element. The mitres in the corners of the frame are worked precisely and are extremely robust in handling due to the four toothed corner angles. After the magnetic assembly of the basic element, glass and profile frame, a solid constructional unit is created, which offers you a long service life with almost no wear.
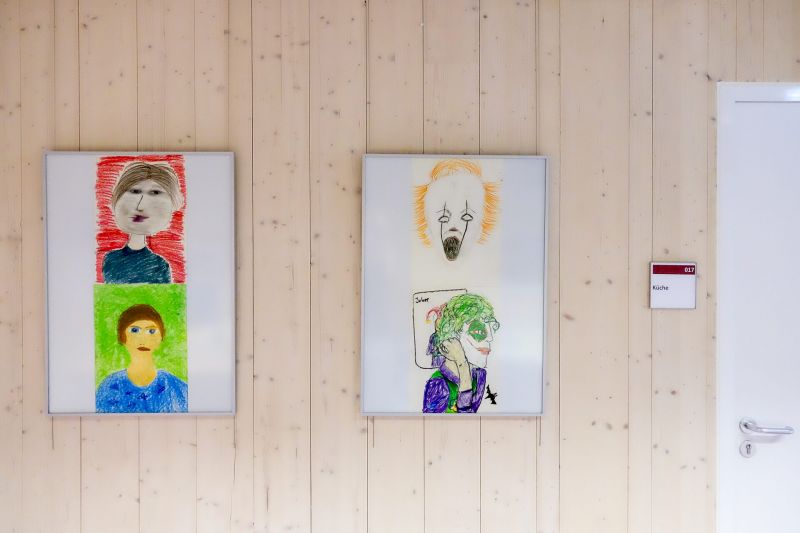
Corridors and Classrooms can be beautifully decorated with paintings - students present the results of their art lessons and the school shines with its personal school art gallery. In order to do everything right when choosing frames and hanging systems, there are various aspects to consider. In this guide you will receive valuable tips and assistance for planning, purchasing and hanging school art in HALBE magnetic frames.
Content
- 1. Why are HALBE magnetic frames so suitable for schools?
- 2. What are the bestsellers in schools?
- 3. Which frame formats are used for school art?
- 4. How many frames do I hang on one wall?
- 5. How many walls and rooms do I decorate?
- 6. What are the options for mounting frames?
- 7. When does fire protection matter?
- 8. What should be considered when selecting different types of glass?
- 9. What about safety and durability?
- 10. How easily are the frames mounted?
- 11. What does the optional mounting service from HALBE provide?
- 12. How long does production and delivery take?
- 13. What does the HALBE frame configurator show me?
- 14. How do I get an offer for application purposes?
- 15. Where can I find more details about the presentation of pictures?
- 16. Who will answer any open questions?
HALBE Magnetic Frames
All frames can be opened and closed magnetically from the front, without turning and flipping the frame, without tools. It is so easy that students can even frame their own paintings. The construction is designed for precision and durability and has received many awards. You will not only receive picture frames, but a complete coordinated system with hanging systems up to the hanging service. Purchasing directly from the manufacturer guarantees a very good price-performance ratio.
Bestsellers
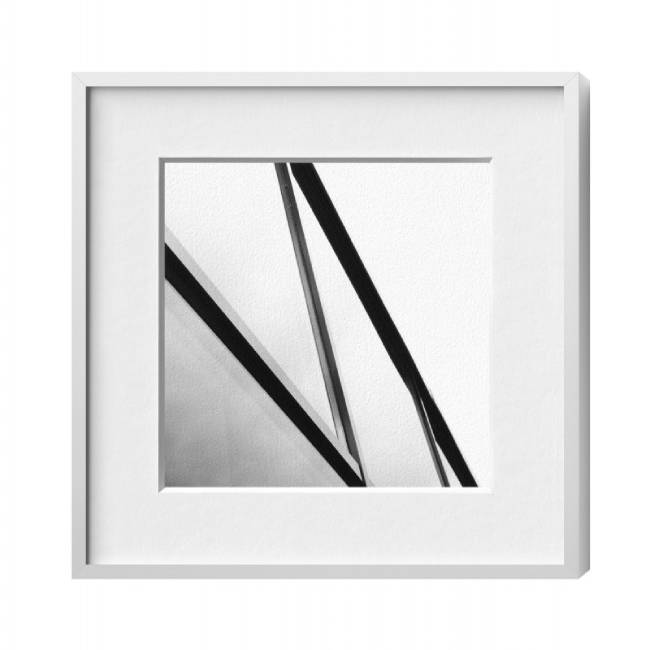
In schools, Classic and B1 magnetic frames made of aluminum are the first choice, usually in matt silver and with a rectangular profile in a timeless design. Because of the variety of picture sizes, the artwork is usually presented without a passe-partout and placed directly on the white back wall. Alternatively there are other colours, rounded profiles and wooden frames.
Frame formats
Larger DIN formats from DIN A2 to DIN A0 are very popular. Equally popular are 500 x 700 mm, 700 x 1000 mm or 600 x 800 mm. Common paper formats can be presented well in these proportions and also show several pictures in one frame. The formats can also be combined with each other thanks to their similar proportions.
Room Planning
You can equip all rooms at the same time or step by step, depending on your budget and circumstances. Get an idea of the minimum scope of the project and the maximum realization. Often the frames are procured step by step and gallery rails are installed immediately in all rooms. Usually the corridors and art rooms are the first step.
Hanging Systems
Use gallery rails and ropes if you do not want to place the frames permanently or if you want to avoid drilling holes in the wall. They remain flexible in their arrangement and can be redesigned at any time. The fixed hanging is done with picture hooks, optionally with securing. From HALBE you get everything perfectly matched.
Fire Safety
If regulations for preventive fire protection have to be fulfilled in your house, use the flame-retardant B1 magnetic frame, officially tested according to DIN 4102-1. Visually, the B1 on the wall does not differ from the Classic. All components of the frame are made of metal.
Glass Types
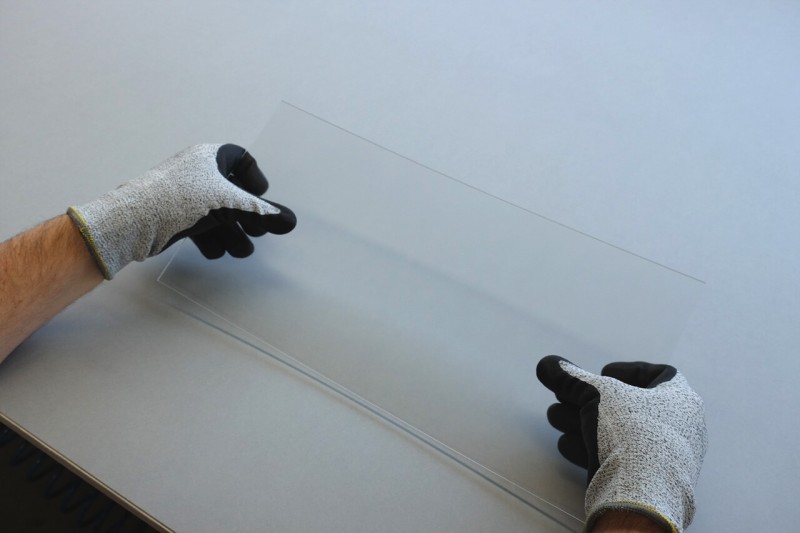
In school, the choice is usually made for glasses that are as unbreakable as possible to minimize the risk of injury. In combination with fire protection/B1, it is safety glass. PLEXIGLAS® can be used for the Classic. All versions are available in glossy and anti-reflective versions. Since they are often hung opposite windows, matt glasses are recommended to reduce reflections.
Full Service
If you don't want to hang the frames and rails yourself, we offer the mounting service as an option. For a cost estimate we need some data about your spatial conditions and we will give you a fixed price. You accompany the installation on site, the rest is done by the installation team.
Durability
Compared to conventional picture frames, magnetic frames from HALBE are still in excellent condition even after many years. The solid construction of the magnetic frame down to the smallest detail guarantees the safe functioning of the frame for an almost unlimited period of use.
Do-it-Yourself
In addition to frames, HALBE also offers all the accessories for hanging: from picture hooks to a gallery rail system to picture security. The mounting is usually supervised by building services and art educators. Optionally, HALBE offers a Germany-wide hanging service for rails and frames.
Delivery Time
In the case of school equipment, purchases are usually planned several weeks in advance. With tempered safety glass we need a maximum of three weeks, most variants can be produced within one week. Please let us know your wishes regarding the delivery date.
Wall Design
In corridors a row suspension of frames of the same size is often implemented. Sketch and measure the individual wall surfaces and take photos of the rooms analogically. This makes it easier to determine sizes and quantities. The exact placement is often made during installation.
Colour
Most often picture frames with silver-colored aluminum profiles are used in schools. Why? They are considered to be more robust compared to wood, are timeless in shape and colour, and in terms of cost effectiveness are less expensive than solid wood frames.
Frame Types
The frame types CLASSIC and the fire protection variant B1 are the first choice at school: On the wall they are indistinguishable. If you have to follow regulations for fire protection, the B1 is the right choice: In contrast to the CLASSIC, the frame is completely made of metal and officially tested according to DIN 4102-1. In short: the frame meets the often required "B1 standard", i.e. it is flame-retardant.
Tip
Very popular are the CLASSIC and B1 magnetic frame in aluminium 8 silver matt with matt plexiglass or toughened safety glass in the formats 500x700mm, 600x800mm, 700x1000mm or as DIN format 420x594mm (DIN A2), 594 x 840 mm (DIN A1) and 840 x 1190mm (DIN A0).
Formats and Proportions
On this subject, there are frequent questions about the "right" format for picture presentation at school, as well as clear bestsellers that have been emerging for many years for good reasons. It doesn't always have to be the classic painting pad, but also if one starts out from typical paper formats in the art field: often so-called divisible formats are combined with each other, i.e. different formats are ordered instead of everything in a uniform size.
For example, a DIN A1 frame hung horizontally is just as high as a DIN A2 frame in portrait format. This has advantages for the later interior design or the division of wall surfaces and the DIN formats are also suitable for many common paper formats. Whether for paintings, photos or text posters for information. In DIN A2, for example, two DIN A3 sheets fit next to each other.
The same applies to the bestsellers 500 x 700 and 700 x 1000 mm or 600 x 800 and 400 x 600 mm. The frames have a pleasant height-width ratio. In a 500x700 mm frame, one DIN A2 sheet or two DIN A3 sheets appear as if they were embedded in a passe-partout.

Ultimately, you are free to choose your desired sizes from the more than 30 standard formats or even have your own special formats produced to measure. Consider these formats as a tip and suggestion for what your colleagues in other schools are doing in this matter in order to be able to exhibit as universally as possible and to be flexible.
White Backpanel
The basic element or the back panel of a HALF magnetic frame is always white, both for the CLASSIC and the B1. This is ideal for presenting several small-format sheets in one frame without necessarily using a passe-partout. They have an optically neutral and clean background as standard. For easy fixing of the sheets, you can also order immediately removable self-adhesive products from us. Depending on paper properties, size and type of glass, often the even glass pressure is sufficient to hold the image in position without self-adhesive fixation.
The simple basic shape with even distribution over the length of the wall can be varied easily and creatively. You can form groups and hang, for example, three frames closer together, leaving a clear distance to the next group. This gives you more freedom to hang the frames later on, for example to hang them crosswise instead of upright or to change the hanging without changing the whole corridor.
Possible Arrangements
General Rule for Wall Design
The shorter the wall, the more suitable the surface is for a single frame in large format as an eye-catcher. It does not have to be exclusively the horizontal row hanging in the hallway. Also an option if the frames are to be placed permanently in the same place without gallery rails: A block hanging of the same format or an edge hanging in different sizes can be an attractive design if there is enough space - for example on a free wall in the cafeteria or on the intermediate level in a spacious staircase.
The situation prior to the first occupation of the building is usually different from the situation when the rooms are decorated while the school is in business - both in terms of budget and equipping the rooms with picture frames. While the architect's office already thinks about the basic equipment and illustration for a new building, it is often the case with existing properties that the question is raised in the context of a renovation or completion of the interior design.
To answer this question, you proceed step by step on the basis of the floor plan:
-
First, you select the rooms in which pictures are to be exhibited. The priority of most schools is: first the corridors and staircases and often the art rooms - followed by common rooms like cafeteria, communal rooms etc. and mark the rooms in the floor plan.
-
Then you take the printed floor plan and go from room to room and mark the appropriate walls in the rooms. Often free and suitable walls are those in the hallway opposite windows and between wardrobes. In staircases, the walls of "intermediate levels" are easier to frame than the diagonal staircases. In classrooms, it is often the walls opposite blackboards and windows.
-
The number of frames per wall can be roughly estimated. The broad rule is that only 50-60% of the available space should be used for picture frames. For frames hung in rows only larger free wall areas are available. Doors, cupboards, windows, fire extinguishers, washbasins, etc. must be subtracted from the wall length, as must "dead" areas. This includes, for example, small areas between door and wall. For the approximate number of frames, 50-60% of the usable area is divided by the selected frame sizes. You can write the number of frames into the plan.
Example: 70x100 cm frames on a 10 meter long wall with one door, hanging side by side in portrait format:
- Total width of the wall: 10 m (height 3 m). The center of the picture is at 155 cm for a comfortable viewing height.
- Available wall width left of the door: 8 m
- General rule, roughly determined number of pieces for 70 cm wide frames: 50-60% of these 8 m are covered with frames = 4.00 to 4.80 m: 6 frames in 70 cm width = 4.20 m
Tip for symmetrical row hanging in this example:
8 m wall width
minus 4,2 m "frame width"
= 3,8 m to be distributed for the distances between the frames and the surroundings
In the example above, we have divided the 8 m wide wall area in the middle at 4 m and distributed the frames with equal distances to the left and right from the middle. To the wall to the left and to the door to the right the distance of the frame is about twice as big as between the 6 picture frames.
3,8 m / 9 (5 x single distance plus 2 x double)
42 cm = Distance between the individual frames
84 cm = Distance to the left wall and to the door. Otherwise, one meter is also a good orientation for the distance to the walls.
Our advice: If you want to hang picture frames flexibly on ropes: plan and mount the gallery rails immediately for all walls on which you want to hang pictures on ropes. The gallery rails are not too expensive per meter and your rooms are perfectly prepared for the expansion of the school gallery - either in one swing or step by step. Not to be neglected: the effort for the installation of your gallery rails is reduced in total if it is done immediately, comparable to painting a wall, instead of having the painter come room by room. For the sake of appearance and simplicity during installation, we recommend running gallery rails over doors. Gallery rails should reach up to about 2 cm to the wall. So, for example, sliding hooks can still be comfortably inserted into the channel of the gallery rail.
That depends on your plans. If you have decided on a fixed wall design that is to hang unchanged for the next few years, you can simply hang with nails or screws, depending on the weight of the frame and the nature of the wall. If the frames are to be secured against hanging or falling down, you can fix them with the BS4 picture lock.
If you want to be flexible in the long run regarding the arrangement of the pictures and do not want to drill new holes into the wall all the time, the decision is clear: You need a gallery rail system for hanging on ropes. So your students can creatively organize the exhibition of their works.
Stay Flexible with Gallery Rails
Especially when using rope suspension on gallery rails, you have all options to flexibly adjust your image suspension over time. If, on the other hand, you hang your frames directly on the wall using dowels and angle hooks, you have fewer options for changing the picture arrangement later - certainly the most important aspect that speaks for a gallery rail system.
If you place your pictures at fixed positions and perhaps even want to secure the frame to the wall, hang your frames on angle hooks with dowels.
Prepared for Suspension
The CLASSIC and the B1 magnetic frame are prepared with hanging holes all around the back. All frames are prepared for hanging on ropes, directly on the wall and for the optional picture lock BS 4.
If you want to dive deeper into the topic of suspension, we have prepared extensive information in text, picture and video for you:

Safety is a very important issue in schools. Preventive fire protection in particular has become significantly more important in recent years and is a significant topic alongside the general safety of furnishings. Sometimes the fire safety regulations on the subject of "B1" are not uniformly formulated for the entire building. There is no standard nationwide regulation, as the so-called protection goals are defined in the building regulations of the federal states and locally. For example, there may be higher requirements for preventive fire protection in corridors, escape and rescue routes and the staircase than in a classroom or the secretary's office.
From our experience, the regulations on this issue are more likely to increase in importance than the other way around. The applicable regulations in your building are known to the school management, the school board or the responsible authority as the school authority.
If you are unsure or if there is room for interpretation, you are on the safe side with a B1 magnetic frame now and in the future: the frame has been officially tested by the Materialprüfungsamt (material assay office) NRW according to DIN 4102-1 with the corresponding certificate.
Simplified in just a few words, the following can be said about "B1" and DIN 4102-1 for fire protection laymen: According to DIN 4102-1, the fire behavior of building materials and components is classified into categories. A product is categorized in class B1 if it is flame-retardant and does not continue to burn on its own after the ignition source has been removed. The B1 magnetic frame has been successfully tested according to this DIN standard.
There are many aspects to picture glass - here we concentrate on the most important factors in school practice.
Break resistance is the most frequently mentioned factor when it comes to choosing glass for picture frames in school. No problem: For the B1 fire-resistant variant, use toughened safety glass. For the CLASSIC without fire protection requirements, PLEXIGLAS® is available as an anti-reflective grade, with a glossy and even scratch-resistant coating on one side - no insignificant advantage for schools over time.
Glossy or anti-reflective? The question cannot be answered with one or the other, but it is certainly possible to give good advice.
A glossy glass offers perfect contour sharpness in every detail. Colors come out stronger and more brilliant than with a frosted glass. The disadvantage can be seen on the comparison photo on the left: If, as in the example, a window is opposite, disturbing reflections become visible. Depending on local conditions, this plays a more or less important role.
The anti-reflective glass frosted on one side takes away the reflections and the image can be viewed undisturbed. The light is refracted through the slightly roughened glass surface. The image appears somewhat duller than with glossy glass, but text is much easier to read. Our tip: opt for the anti-reflective variant if your priority is not absolutely clear - the glass is matt on one side and glossy on the other. So you can simply turn it over and use it either glossy or with an anti-reflective effect. This variant is available for all three glass types.
Glass differences in detail: If you would also like to deal with further topics related to picture glass, we recommend our know-how section for glass.
Protection against theft
The BS 1 picture safety device to protect pictures against theft is rarely used in schools. In contrast to BS 4, this security cannot be added later, but must be taken into account when producing the frames - nevertheless, for the sake of completeness, the BS 1 option is mentioned for your information.
No matter how you decide: Your frames will always be safe and durable with HALBE!


Good Planning for Easier Mounting
It is best to clarify the topic while you are planning the order: often the janitor or building management in cooperation with the art educator is responsible for making sure that the pictures look good on the wall. If you have the know-how and the time, you can include everything in the order (except the necessary tools) - besides the frames, you can order everything from gallery rails to angle hooks or self-adhesive material for the later picture installation in the frame.
All magnetic frames from 280 mm edge length are prepared for hanging at one or two points. No matter whether you want to hang the frames on ropes or directly on the wall: The better you have planned the individual walls when ordering, the easier it will be for you to hang up the pictures later.
The Perfect Height
What is the correct height to hang a picture frame? Generally speaking, this applies regardless of spatial characteristics: The ideal height for pictures is 155 cm from the floor to the center of the picture. Then the picture center for adults is approximately at eye level. Notice: In kindergarten, it may be a little lower than this.
If you hang the frames directly on the wall, you will find practical tips from tools to nail position here.
If you decide on gallery rails and mounting on ropes, the final arrangement and height of the pictures is only the second step in the hanging process.
Tip for Installing Gallery Rails
A proven practical tip for the installation of the gallery rails: Place a water level under the ceiling and draw a line with a pencil. Screw the wall clamps onto this line at intervals of 30 to 40 cm. This will give you an even distance to the ceiling, even in long corridors, and you will have enough space for handling the drill - an important and often neglected aspect in design planning. Your auxiliary line disappears behind the gallery rail.

Position the Frames on the Floor
Once you have mounted the gallery rails, it is best to place the frames roughly in front of the wall and place them on the floor first, or lean them carefully against the wall - most safely still packed. When you have found the right positions, hang the ropes with the fixed hangers into the gallery rail and hang the frames by using the holes at the back of the frame.

Tip
First hang one frame to the perfect height and then prepare the other ropes in the same way (i.e. push the fixed hangers to the same height on the rope) before you climb the ladder again. This way you hang all pictures in the same frame size at the same height much faster without having to adjust them individually afterwards.
As soon as we receive your order, we schedule the production of your magnetic frames. At HALBE there is no stock of finished goods, all frames are made individually for you. Your advantage: You will receive customized products within the shortest time directly from the manufacturer.
With the fire protection picture frames B1 in combination with tempered single-pane safety glass it usually takes two to three weeks. These glasses are processed by grinding, thermally tempered and go through a predetermined process to be allowed to bear the ESG test stamp on the glass.
All Classic and B1 variants without toughened safety glass are usually produced within one week and ready for shipment by a forwarding agency.
Please let us know your desired delivery date with your initial inquiry or when ordering. Then we can best plan the delivery date and the mounting service you may require.

Once you have defined your frame formats, you can begin to plan your wall design by placing your frames. Often there is not enough time to plan or even visualize every single wall in all rooms in detail.
A practical tip: It is advisable to first design one corridor and one classroom. Then you will have a good basis for determining the number of frames for your order. For example, if there are 6 frames in 70 x 100 cm on an 8-meter wall, you can first extrapolate the running meters of wall in the entire building if you largely want to repeat the frame sizes and room design.
The exact placement to the centimeter is often done on site during the installation - in the following we will show you some ideas how to design walls with the format 500 x 700 mm and the twice as large format 700 x 1000 mm, for example.
The classic hanging in schools is a horizontal or row hanging:
Full Service from One Place
If you do not want to do the installation of gallery rails and magnetic frames yourself, we are happy to offer you the mounting as a complete service from one place.
This means: You tell us your requirements for magnetic frames plus gallery rails and accessories, if applicable, and complete the short checklist for the mounting service. We need these key data as a basis for calculation depending on the spatial conditions. Usually this information is sufficient to provide you with an offer for the optional hanging service. We will clarify any questions you may have by phone, quickly and unbureaucratically.
Information on prices: We always work with a fixed price. This is a clearly calculable price for you - without risk and without discussion about possible additions to the contract - even if it takes longer than planned.
Frame Configurator
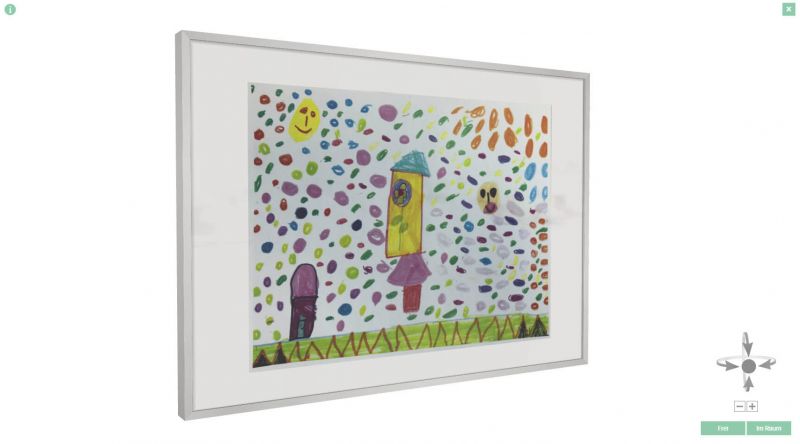
You can put together your frame variant in just a few steps: For example, try out colours and dimensions and define your frame favourite. The 3D view gives you a good feeling for proportions and the effect in space. You can order online or contact us for more details.
Budget & Estimation
Do you need a quotation in advance of your order to apply for the funds? No problem. Send us your wishes informally by e-mail and we will prepare an offer for you - we are happy to provide you with different variants and, optionally, with a mounting service if you need a team of craftsmen.
Know-how
Generally speaking: We are happy to personally advise you by phone! If you would like to expand your knowledge about pictures and frames, we have a large know-how area with information about picture presentation for you - explore technical differences and tips for design in word and image on our website.
Personal Contact
Let us consult you personally. Based on decades of experience, we can answer many questions that may not be immediately in focus at first glance and are quickly forgotten during planning. We will be happy to provide you with a personal contact person for all aspects of your project.
Glass Types
The B1 magnetic frame already fulfills the DIN 4102-1 standard with the inexpensive normal glass - under the aspect of safety and the danger of possible glass breakage, schools prefer single-pane safety glass in the context of B1 regulations. It hardly breaks at all, and even if a frame falls to the ground and the glass breaks: it falls apart into many small crumbs that cannot cause injury.
Both normal glass and toughened safety glass are available in the glossy variant or as anti-reflective glass frosted on one side. Advantage here: the anti-reflective glass is frosted on one side and glossy on the other - you do not have to decide before buying and can still determine on site and over time with which effect you want to use the picture glass.
Whenever the subject of fire protection can be dispensed, CLASSIC is used in schools. In contrast to the B1 magnetic frame, the shatter-proof PLEXIGLAS® grades can also be used here, and the hardened and more expensive toughened safety glass is not necessarily required.
If you are uncertain, you should rather use the B1 magnetic frame and be prepared for possible future changes to fire protection in schools.
Regarding design: In addition to the bestseller "Alu 8 Silver matt", there are other profiles and colours available for the CLASSIC and the B1.
To get a feeling for the design and the necessary number of frames, it is best to make a small scale sketch and draw the variants. Even more flexible and also suitable for later use in class is a sketch of the wall on paper and the frame sizes cut out of paper to scale. Then you can move the frames freely on the wall and take a photo of your favorites. A scale sketch with the most popular frame sizes can be found here.
Single-pane safety glass (ESG): the material is thermally toughened and particularly break-resistant. If the glass is broken due to excessive stress, the pane breaks into tiny pieces without sharp edges - thus massively reducing the risk of injury.
PLEXIGLAS®: a 3 mm thick acrylic sheet from Röhm. It is light, break-resistant and hardly destructible under normal circumstances. The material is extremely durable and is the first choice in schools when fire safety is not the focus.
Standard glass: this glass is the cheapest option and is only recommended for schools under budget aspects. Certainly only in those areas where shatter protection is not an important factor. Much more care is needed when changing pictures than with ESG and PLEXIGLAS®, especially with large formats. This is especially the case when there is a risk of shattering.
Durability
At HALBE, functionality and longevity are the top priorities in product development, alongside design. This offers you substantial and tangible advantages.
The individual components of the frame are all made of high-quality materials and are processed with extreme precision. The basic element is stable and flat for a very good picture support and welded in the corners. The profiles of the frame are interlocked in the corners and the frame has a perfect mitre in the long run. All lenses have a C-edge cut, and the PLEXIGLAS® is cut smooth and clean for injury-free work.
The precision and accuracy of fit down to the smallest detail make the frame usable for many years, if handled carefully it can be used for many years without optical and technical wear. The magnetic force of the internal magnetic strips is permanently guaranteed.
Safety
Security covers two aspects: During handling, the risk of injury is reduced to a minimum by construction. In addition to that, there is also picture protection and room safety:
If you do not want to hang your picture frames flexibly with ropes on gallery rails, the frames can be secured to the wall and optionally even prevent the opening and removal of the pictures.
Protection against falling or removing
The picture lock BS 4 offers several possibilities:
Normally you hang the picture frame on the wall with two angle hooks on the top left and right in the classic way. The frame lock BS 4 is then screwed onto the wall using a drilling template and locked in place with a special key. A lock that also meets museum requirements.
In school, it is not so much a question of theft protection for the framed picture, but rather of securing the frame against unintentional falling down - for example, if the satchel or student comes too close to the picture ... the "light" application of the BS 4 is therefore popular here: the frame is only hung and secured in the middle of the top with the BS 4 instead of with angle hooks. The frame can now still swing back and forth, but does not fall off the wall so easily. This variant is recommended for small and medium formats up to approx. 600 x 800 mm, larger frames should always be hung at two points.


Suspension & Fine Adjustment
The exact vertical alignment of the ropes is best done in pairs. Hang two ropes per frame into the gallery rail from below by eye. Then hang the frame on the two fixed hangers. Finally, align the two ropes vertically - ideally, check the intended distances between the two neighboring frames in the row at the same time. Now your school gallery is perfectly presented.


Procedure and Timing
If you choose our mounting service, we will mount the gallery rails and hang your frames. The delivery of the goods will be done in advance by a shipping company. The two dates a) for the delivery by forwarding agency and b) for the hanging will be coordinated with you precisely and reliably.
How long does such an installation take? As a rule, plan on one working day, for larger jobs it can also be two days - depending on the type and scope of your order and the premises. And if it's only the gallery rails for a few walls in the first step, it can sometimes be done in half a day. Please feel free to ask questions and talk to us. We are looking forward to hearing from you!
On the installation date, you will accompany the installation on site and inform the fitters which products will be mounted on which walls. You are free to frame the products yourself - thanks to the magnetic frame system it will be a pleasure to fill the frames with pictures - perhaps as a joint project and experience with your students! In this example here, the art teacher has already fitted a few frames with pictures during the assembly appointment.
In our online configurator you can put together your magnetic frames as you wish and order them immediately. Especially at school it is often only used for the "pre-selection" of variant, profile, size and type of glass. For art teachers and administration it is in any case a practical tool to select frames in various options and to budget the purchase.
In addition to the selection of all details of frame design and price for budget planning, the configurator also offers the possibility of image upload and a 3D view. Try it out and test the different effects of the different profiles and colors. You can take the frame in your hands digitally, so to speak, and examine it from all sides.
Exemplary comparison between a frame in silver matt and black matt:


Some schools order online immediately. In many schools it is common practice to request an offer for the application of funds for presentation to the school management or school boards.
Please inform us of your requirements informally by e-mail or call us and we will coordinate the offer phase with you. Usually we can clarify (almost) all questions in one phone call and the way to the offer is quick and easy.
If you would like to be offered the mounting service as an option in addition to the delivery of the products, we also need the completed checklist for the mounting service in addition to the article overview.
You will receive your offer by e-mail as a pdf file. Please clarify before the inquiry to which address the offer should be correctly addressed. This can be the school, a certain department in the administration or in exceptional cases an art teacher, architect or planning office.
If you have received a delivery from us before, we will be happy to compare the frames delivered earlier with your new ideas so that everything fits together.
On this page we have prepared information especially about picture frames in schools for you. In our extensive know-how section you will find a lot of general information on other topics.
Whether it's about the proportions of passepartouts, details about the different types of glass, step-by-step instructions for picture mounting or why the insertion depth is important if you want to frame more than just paper and cardboard thicknesses:
At HALBE we don't leave you alone with questions and are pleased about your interest in all topics concerning pictures and frames!

Our Customer Service is available for you Monday to Friday - by phone or e-mail. We are happy to share our many years of experience to you and look forward to your ideas!
This is how you can reach us:
HALBE-Rahmen GmbH
Phone +49 (0) 2741 9580-0
Fax +49 (0) 2741 9580-80
info@halbe.de
If you would like to contact your personal consultant directly: the telephone numbers and e-mail addresses can be found here.


Simple horizontal hanging
Tip: The distance to the wall and door is twice as large as the distance between the frames.
Horizontal cluster hanging
Tip: The distance to the wall and door as well as between the clusters is twice as large as the distance between the frames.
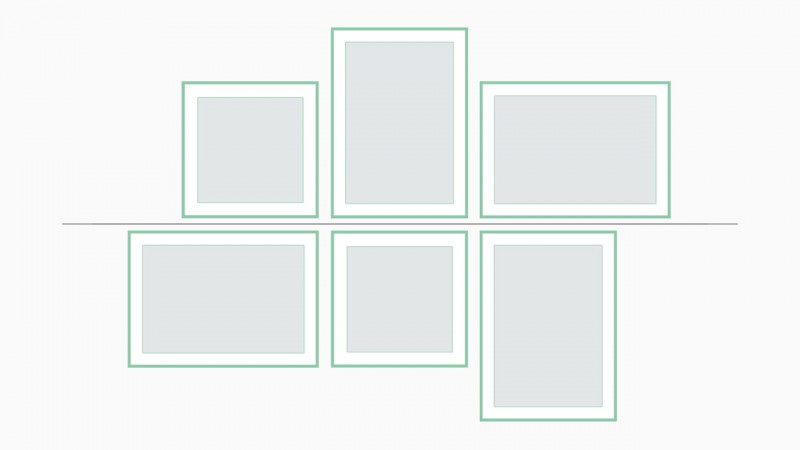
Horizontal cluster hanging with alternating portrait and landscape format
Horizontal cluster hanging with alternating portrait and landscape format - Lower edges aligned
Tip: The small frames hang slightly below, the large ones above the middle axis of 155cm


Horizontal hanging with small frames in portrait format and large frames in landscape format

Horizontal cluster hanging with onle single picture in the middle


Horizontal hanging with chaotic alternation of portrait and landscape format - in the same sizes
Tip: The entire row is centered on the wall, not just the middle frame.
Horizontal hanging with chaotic alternation of portrait and landscape format - in smaller and larger sizes
Tip
When planning the decorated walls, also use the scaled architectural drawings of the building - this can make your measurements much easier. Nevertheless, be sure to walk around the premises yourself and check the conditions: For example, there are often restrictions on the presentation of images in the area of coat hooks or the students' lockers, which are not always apparent from plans.

Checklists for download
 Checklist for mounting service
Picture frames in schools
Tips & Guides
Know-How